How to use Taski
This page is the end-user guide. Use it to learn how to add clients and devices, create worksheets, manage Planning, and connect maintenance templates to devices.
Guided topics
Core workflows
Unified help space
Quick path for a new user
Follow these steps if you want to get productive right away.
Visual tour
The three main screens users click every day
Your starting point for recent work, upcoming checks, and dashboard widgets.
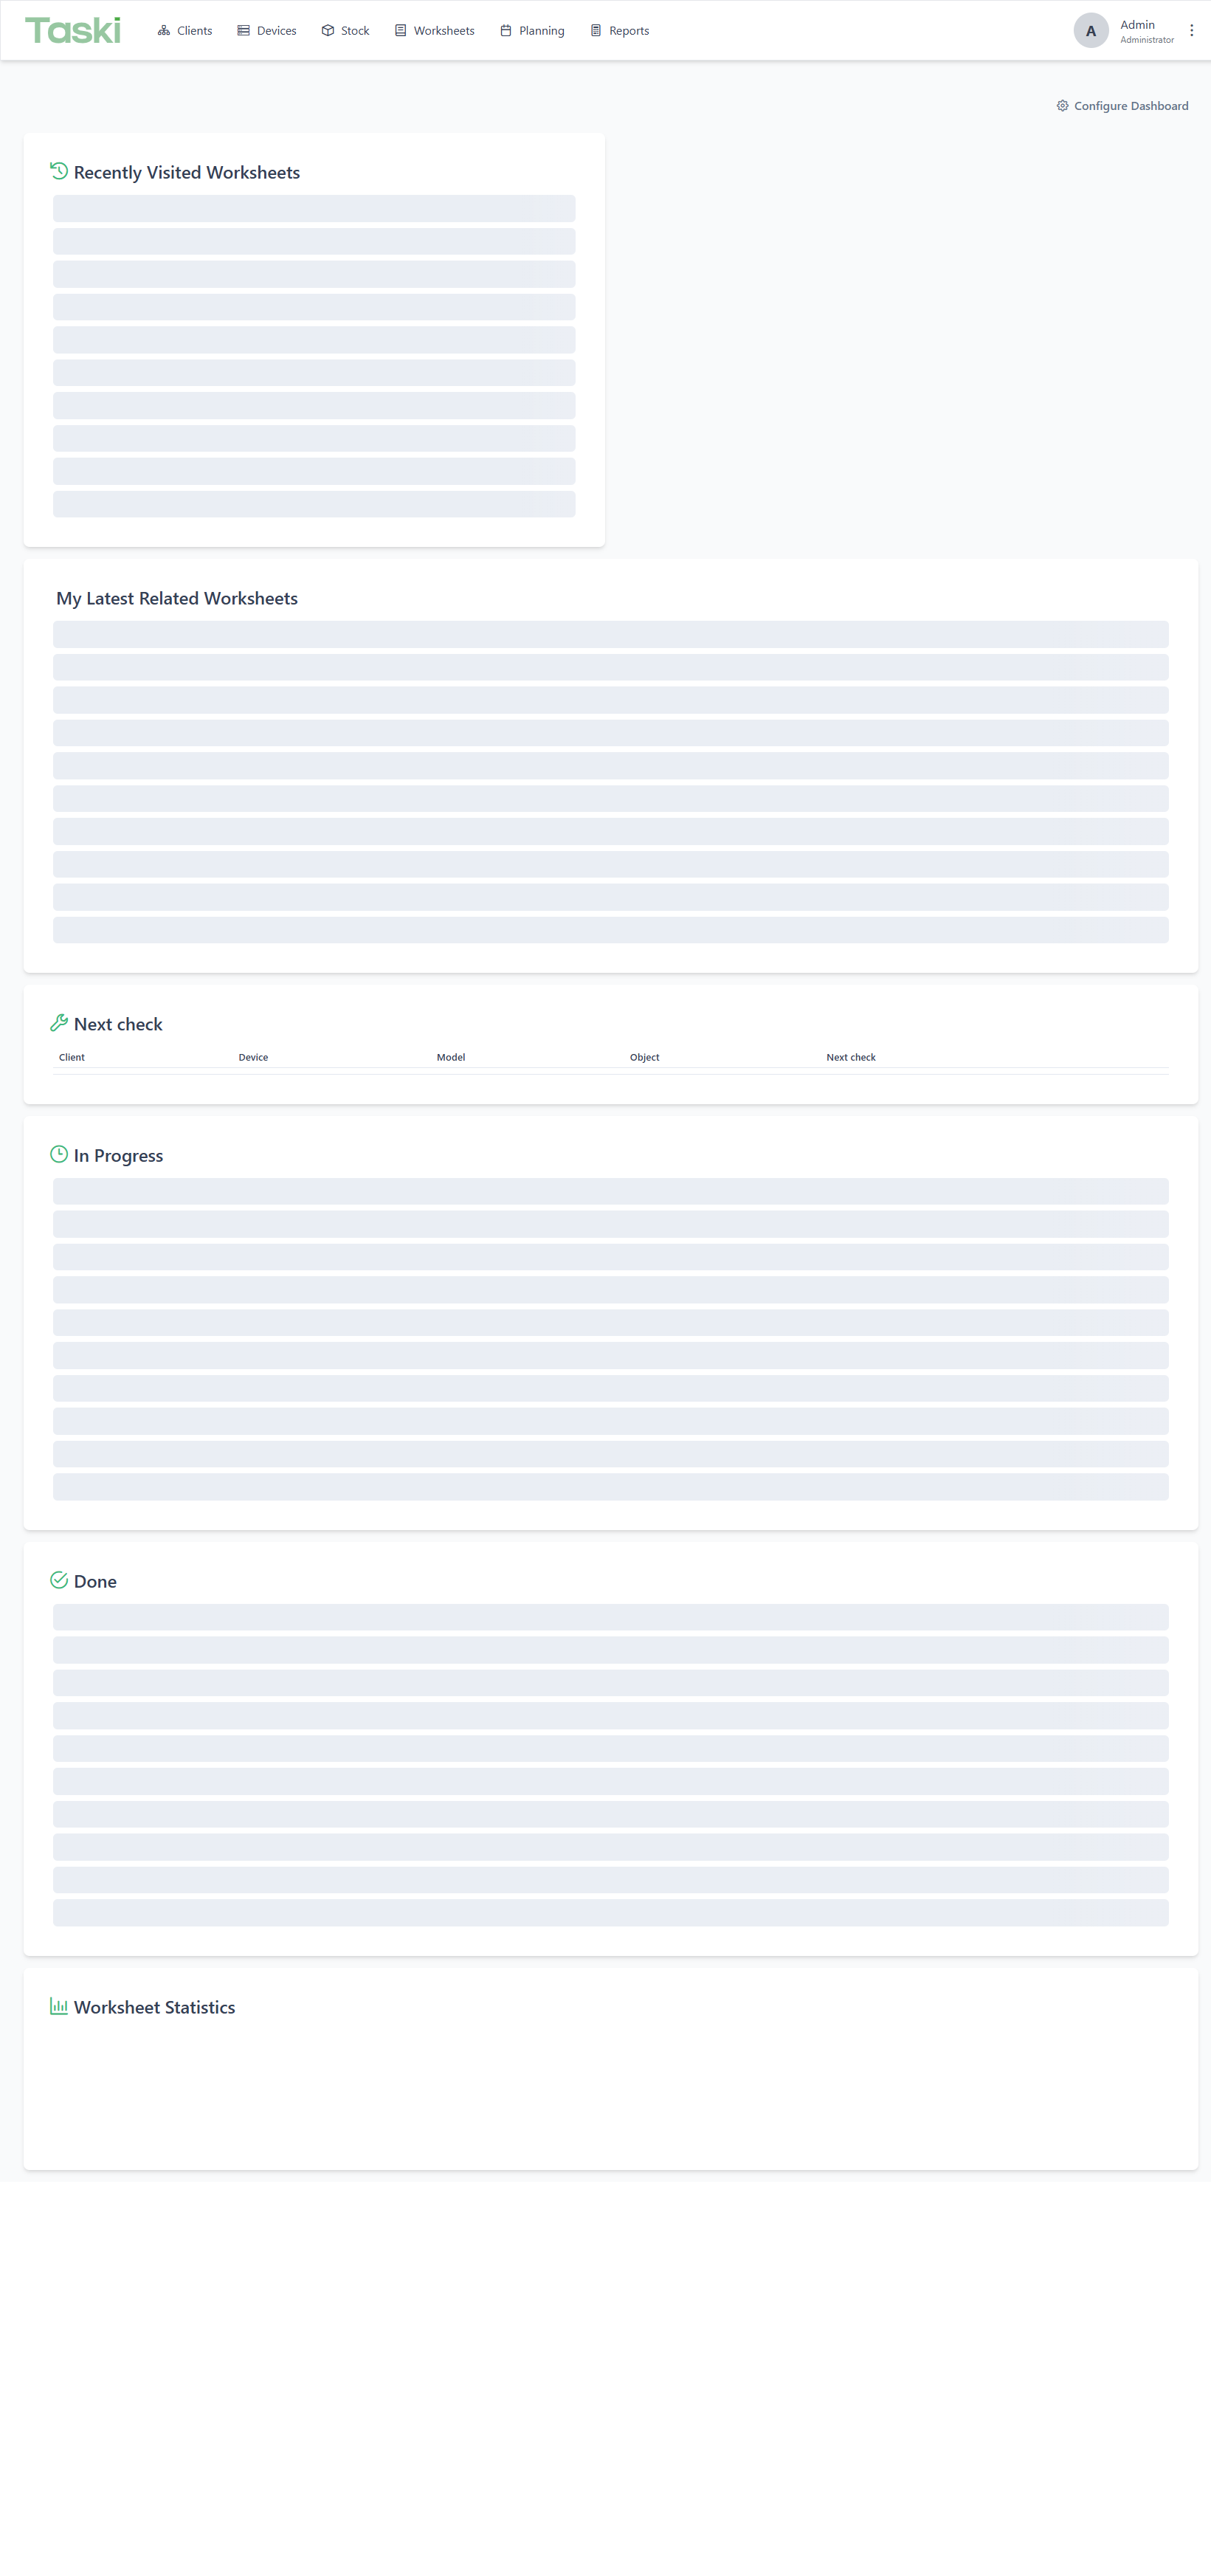
- Configure Dashboard customizes the dashboard widgets.
- Recently Visited Worksheets shows the latest work orders.
- My Latest Related Worksheets and Next check help you track active work.
Use this page to filter devices, add new ones, and open the device templates.
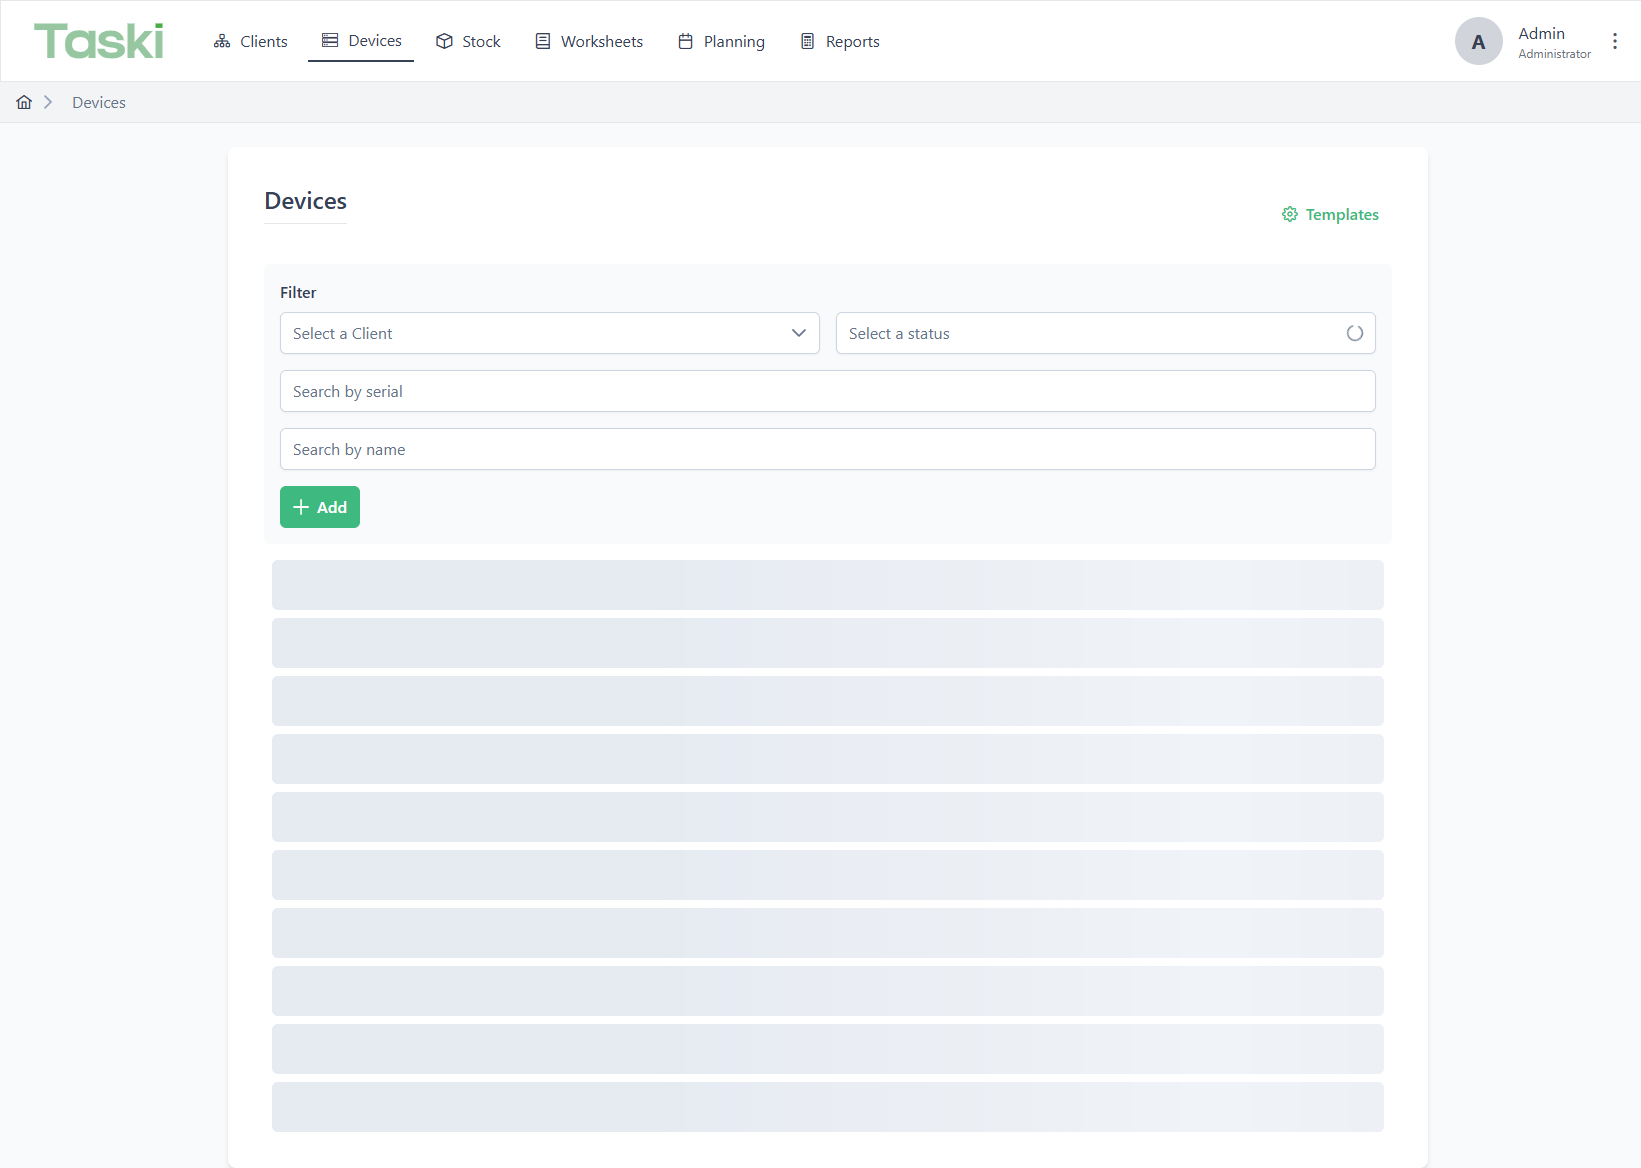
- Templates opens device template management.
- Add creates a new device.
- Filters and search help you find the right asset fast.
Planning combines calendar work, recurring maintenance, and device checks in one place.
- Day, Week, and Month switch the calendar scale.
- Maintenance Templates manages recurring service models.
- Add creates a new event in the calendar.
Button guide
What each main button does
Home buttons
These controls are about dashboard visibility and personal work overview.
Configure Dashboard
Opens dashboard settings so you can show or hide widgets.
Recently Visited Worksheets
Shows the latest worksheets you opened, so you can resume work quickly.
My Latest Related Worksheets
Lists the work items that are linked to your current context.
Next check
Shows the next planned device inspections and maintenance items.
In Progress / Done
Separates active work from completed work for quick status checks.
Worksheet Statistics
Summarizes worksheet counts and workload at a glance.
Devices buttons
Use these to create devices and narrow the list to the asset you need.
Templates
Opens the device template view for custom fields and structure.
Add
Creates a new device record.
Select a Client
Filters the table by customer.
Active
Switches between active and inactive devices.
Search by serial
Finds a device using its serial number.
Search by name
Finds a device by its display name.
Planning buttons
These controls change the calendar view and help you create or filter planned work.
Day View / Week View / Month View
Changes the time scale used in the calendar.
Expand View
Makes the calendar area larger for easier planning.
Show Weekends
Includes weekend days in the calendar grid.
Hourly View
Shows the schedule in hour-by-hour detail.
Settings
Opens calendar configuration and validation options.
Clear filters
Removes all active filters at once.
Add
Creates a new event or planning item.
Previous / Next
Moves the calendar to the previous or next period.
Form guide
What to fill in, what is automatic, and what is read-only
Use this dialog to build a reusable preventive maintenance model before you attach it to a device.
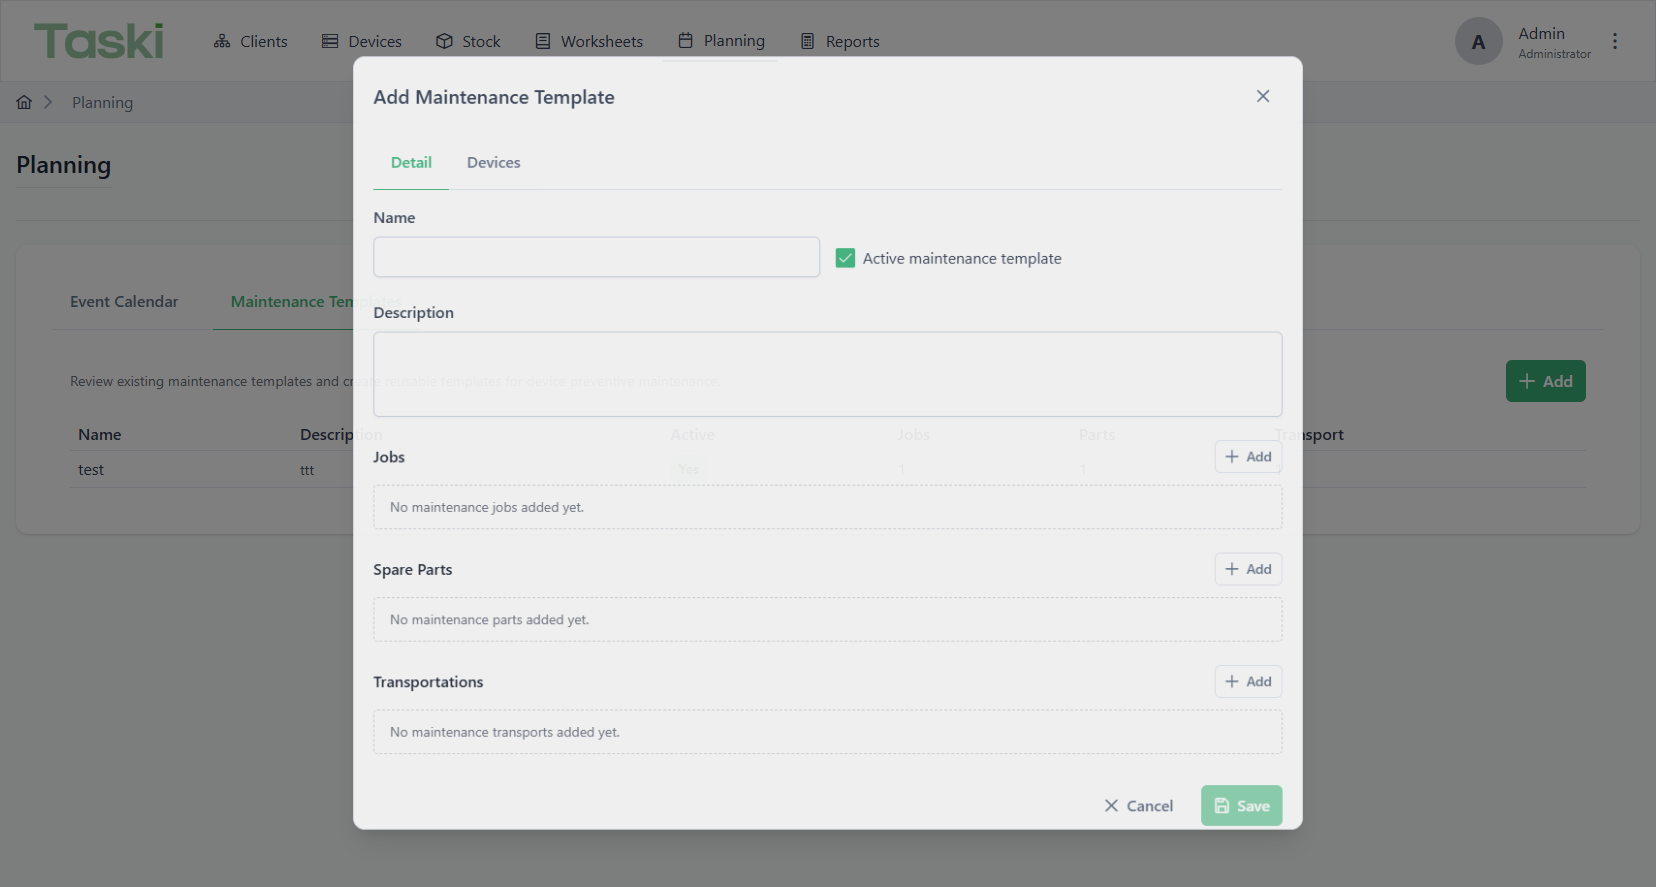
Name
Required. This is the template name shown in the list and in device schedules.
Description
Optional. Use it to describe what the template covers and when it should be used.
Active maintenance template
Turn this off when the template should not be selectable anymore, but you still want to keep the history.
Jobs
Add the work that must be done during the maintenance visit. Each job needs description, work hours, hour type, and employee type.
Spare Parts
Add parts consumed during the job. Each part needs an article, comment if needed, and quantity.
Transportations
Add travel-related lines when the visit includes a destination, distance, or transport type.
Devices tab
Shows every device already linked to this template, so you can see the impact before saving a change.
Why this matters
The Save button stays disabled until the required template fields are valid. That prevents incomplete templates from being attached to devices.
This is where a maintenance template becomes an actual recurring schedule on one specific device.
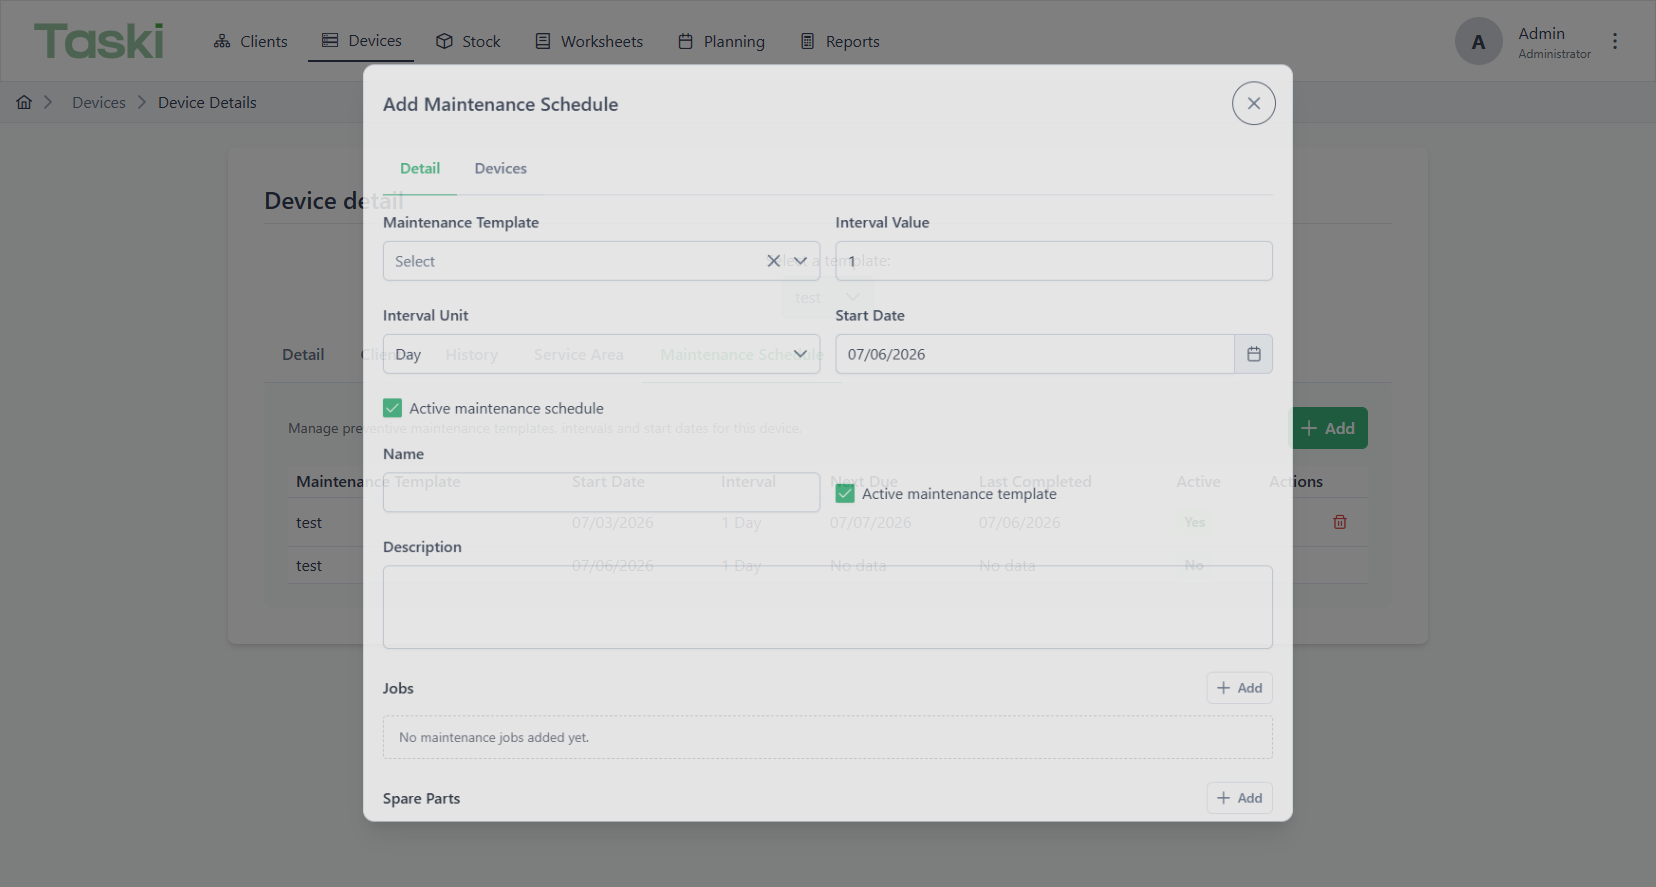
Maintenance Template
Choose the reusable template that defines the maintenance content.
Interval Value
Must be greater than 0. This is the numeric frequency, for example 1 or 3.
Interval Unit
Choose the unit, for example day, week, or month, depending on the template rules.
Start Date
The anchor date for the recurrence. The system uses this as the starting point for the next due calculation.
Active maintenance schedule
Disable this row if the device should keep the history but stop generating new due dates.
Embedded template detail tabs
The editor shows the underlying template details so you can see what will be saved.
Why this matters
The next due date is calculated automatically from the anchor date and interval. If the row is inactive, it remains visible but should not drive new work.
Use this dialog to describe a scheduled event, set assignment, and link it to a worksheet when needed.
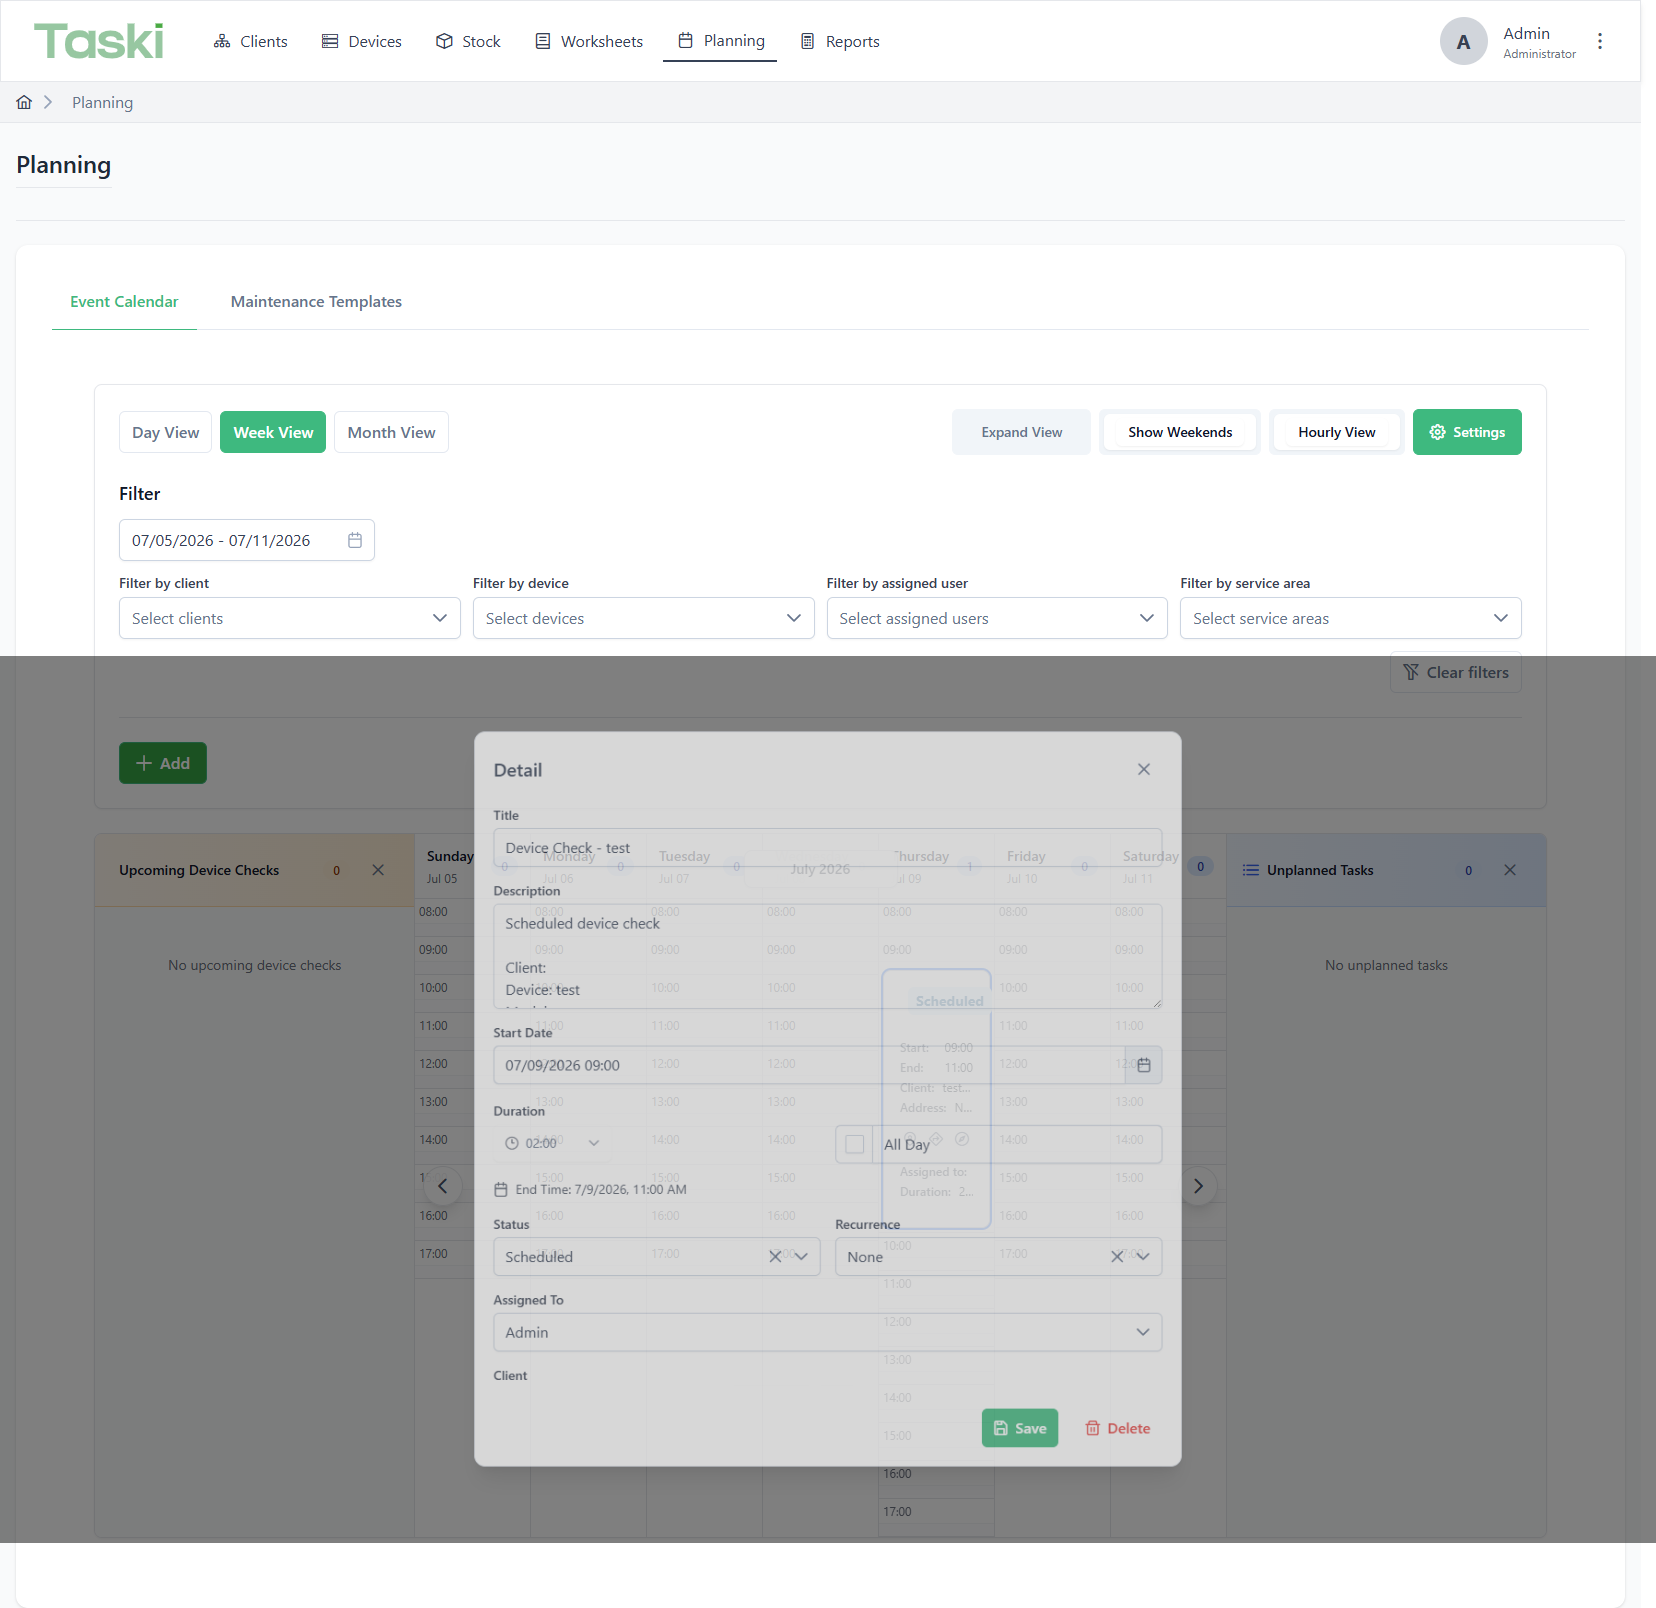
Title
Required. Keep it short and specific so it is readable in the calendar and on mobile.
Description
Use this for the task context, history, or any note that helps the technician.
Start Date
Sets the event start date and time. Changing it shifts the whole event in the calendar.
Duration / All Day
Use duration for timed work. Switch to All Day when the task should block a whole day.
End Time
Calculated automatically from the start time and duration unless the event is all-day.
Status
Select the current state. The allowed next status list is filtered by workflow rules.
Recurrence
Optional. Use it when the event should repeat according to a recurrence rule.
Assigned To
Select one or more users who should see or execute the event.
Client
Required for creating worksheets. Use Deselect if the event was linked to the wrong client.
Device
Available only after a client is chosen. This keeps the device selection scoped to the right customer.
Address
Can be searched, entered manually, or filled from the current device/client location.
Create Worksheet / Link Existing Worksheet
Use these when the planned event should become operational work or be tied to an existing worksheet.
Why this matters
Some actions are intentionally disabled until the prerequisites are met. For example, worksheet creation requires a client, and device selection depends on the client context.
Automation and exceptions
What Taski does for you, and where you must still be careful
What the system calculates automatically
- Next due dates on device maintenance schedules are calculated from the anchor date and interval.
- The event end time is calculated from the selected start time and duration unless the event is all-day.
- The devices list shows next check dates and active/inactive state without manual recalculation.
- Linked worksheet information on events updates automatically when you create or unlink a worksheet.
What you must fill manually
- Template name, job details, parts, and transport entries in maintenance templates.
- Interval value, interval unit, and start date in device maintenance schedules.
- Event title, start date, status, assigned users, and client/device context.
- Address details when the event should be visit-based or location-based.
Important exceptions
- A maintenance template can stay saved even if it is inactive, but inactive rows should not be used for new schedules.
- The Devices tab on a template is read-only context: it shows impact, but the actual device linkage is controlled from the device side.
- If a device or event does not have a client, some downstream actions stay disabled by design.
- Past dates can be used for historical tracking where the system allows it, and those values appear in reports.
Getting started
A fast tour of the app and where the main modules live.
What to do
- 1Open Taski and log in.
- 2Use the top navigation to move between modules.
- 3Open Wiki whenever you need a quick reminder or a step-by-step guide.
User note
This page is meant to help a new user start without searching around the app.
Clients and structure
Create the client hierarchy before adding devices or worksheets.
What to do
- 1Open the Clients module and click Add.
- 2Fill in the client details and save.
- 3Add objects, departments, or locations so devices can be linked to the right context.
User note
Client structure is the base for devices, worksheets, and planning.
Devices
Add a device and connect it to the correct client and object.
What to do
- 1Open the Devices module.
- 2Click Add, choose the client and object, then complete the device details.
- 3Save the device and edit it later if you need to update information.
User note
If the client or object is wrong, the worksheet and planning data will also be harder to follow.
Worksheets
Create work orders and keep task details in one place.
What to do
- 1Open the Worksheets module.
- 2Create a new worksheet and choose the client, object, and device if needed.
- 3Set the status, assignee, and a description of the completed work.
User note
Worksheets are useful for comments, signatures, time tracking, and spare parts.
Planning
Use the planning module for scheduled work and maintenance templates.
What to do
- 1Open Planning from the top menu.
- 2Use the Event Calendar tab to view planned events.
- 3Use the Maintenance Templates tab to manage recurring maintenance models.
User note
Planning is the right place when you want to separate calendar work from recurring maintenance.
Maintenance templates
Build a recurring maintenance model with jobs, parts, and transport.
What to do
- 1Open Planning > Maintenance Templates.
- 2Click Add and enter the template name and description.
- 3Add jobs, parts, and transport, then check the Devices tab to see where the template is used.
User note
The Devices tab helps you see whether a template affects one device or many devices.
Device maintenance schedule
Attach a maintenance template to a device and define the recurrence.
What to do
- 1Open the device detail view.
- 2Go to the Maintenance Schedule tab.
- 3Add a row, choose the template, set the interval, interval unit, and start date, then save.
User note
This is the step where recurring maintenance becomes a concrete device plan.
My Schedule and mobile use
Use the dashboard widget for a fast personal overview.
What to do
- 1Go to Home.
- 2Use the My Schedule widget to see your upcoming work.
- 3Open the event or worksheet directly from the widget when you need details.
User note
This widget is useful for technicians working from a phone or tablet.
Reporting and search
Find data quickly and reuse it in reports.
What to do
- 1Open Reports if you need an overview of work, clients, or devices.
- 2Use search and filters to find the exact record you need.
- 3Export or share a PDF when you need to send the result to someone else.
User note
If something is missing, check the selected client, object, or device first.
Quick answers
Short guidance for the most common questions.
What to do
- 1Start with clients and devices if you are unsure where to begin.
- 2Use Planning when the work belongs on a calendar.
- 3Use a maintenance template when the work repeats regularly.
User note
The same template editor is reused in Planning and in the device maintenance view.
Need help?
If the guide is not enough, request a demo
The Wiki gives you a quick path, but a short demo is still the fastest way to validate your own workflow.